Using the VNC Client for Windows CECESD|200047Applies To
OverviewIf you wish to connect your Handheld PC to a Remote system using the Virtual Network Computing (VNC) protocol you will need to run the VNC viewer on your H/PC. This beginners guide covers how to connect to a use the Windows CE VNC Client. DownloadsHow-to GuideIf you wish to connect to a VNC Server you must be connected to the remote system outside of ActiveSync. You cannot connect your Handheld PC to a VNC server while ActiveSync is running. To do this there are five options:
Local Area NetworkPro. Provides the fastest possible VNC connection Dial-inPro. Provides the most security on a virtual level InternetPro. Convenient for accessing you PC from anywhere VPN TunnelPro. Provides the freedom of the Internet and an additional layer of security Direct Cable ConnectionPro. None Specify the Server Name / Address and Desktop NumberYou've installed VNC server, and now it's time to connect your Handheld PC to it. First you need to install the VNC Views Client for Windows CE onto your device. You can download the VNC View Client package from the HPC:Factor download centre of from the download section of this article
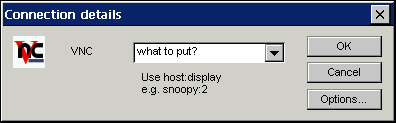
But what to put in the VNC connection box? This will depend on how you are connecting to your server, and even on what Operating System your server is running. If your VNC server is Windows based, the suffix part of the VNC Server address will generally be the same. You must add :0 after the physical Address / Name of the server e.g. 192.168.0.1:0 -or- snoopy:0
To discover the IP Address / Name of the computer you are connecting to: If you are connecting over a Local Area NetworkWhether you can use the Remote Computers Name will depend on the complexity of the LAN you are using. To discover the name of the VNC Server computer.
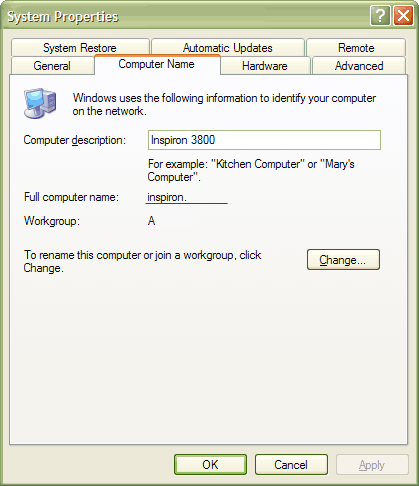
In the above example the computer name is Inspiron. So on the Handheld PC in the VNC Client connection box you would type: If the VNC client cannot connect to the remote computer using the correct Computer Name then the LAN you are using may not be sophisticated enough to connect using the Name*. You should now try and connect to the VNC Server using it's Network IP address. To discover the IP address of the computer running the VNC Server:
(Under non-Windows platforms consult the OS documentation on how to lookup the IP address) If for example the IP Address is listed as 192.168.1.165 you would then type the following in the VNC Client's address box: * NB: You will need a local DNS or WINS server in order to accomplish this If you are connecting using a Dial-in connectionYou will need to know the Dial-up Server's designated IP address
Type the IP address of the host system into the VNC Client connection box followed by the Desktop suffix e.g. :0 If you are connecting over the InternetYou will need to know the Public IP address of your VNC Server System. To discover the IP address:
(Under non-Windows platforms consult the OS documentation on how to lookup the IP address) On your Handheld PC you must connect to the Internet Then in the VNC Client Connect to box you must type the IP Address found in Step 8 followed by the desktop suffix e.g. NB: Depending on your Internet connection your Public IP address may change every time you re-dial or reboot. So you may need to check the IP Address frequently If you are connecting through a VPN TunnelYou will need to know either the IP address of the server machine awaiting a VPN connection or the IP address of the VPN Gateway that you need to contact. Further information on VPN connections is out of the scope of this article. If you are connecting over Direct Cable Connection Once you have the DCC connection established you will be able to use the Computer name to contact the remote server. To discover the Computer Name see the 'If you are Connecting over a Local Area Network' section. e.g. snoopy:3 If using the Computer Name fails you will need to know the DCC Host IP address. To discover this under Windows 2000, XP, 2003:
Type the IP address of the host system into the VNC Client connection box followed by the Desktop suffix e.g. :0 If you are connecting through the cradleActiveSync uses a fixed IP address range for peer communication between host and client device. To connect to your host PC from the Handheld PC specify the following server address/desktop ID in the client: Setting the VNC Client OptionsOnce you know the Server address and desktop number that you are connecting to you may need to configure some of the connection settings.
To do so, click the options button on the VNC Client window.
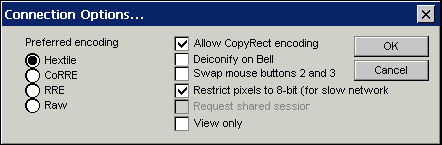
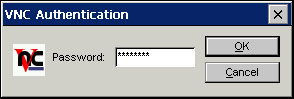
The Connection Options dialogue allows you to specify additional client settings and information that you want the server to take into account while you are connected. We recommend that you leave the Encoding options on Hextile, unless you are experiencing difficulties. Copyrect encoding improves the draw processing of the viewer and should be left enabled unless you are experiencing problems. Deiconify on Bell will initiate an Audible beep on the viewer on a system event. This option is only available when connecting to UNIX Swap Mouse buttons 2 and 3 is for use under some older workstations which require a 3rd mouse button. You should not need to change this setting Restrict pixels to 8-bit (for slow networks) is important when using a mono H/PC, a older Windows CE 2.0 device or a slow connection. This option reduces the size of the information being sent from the server by limiting the colour information to 256 colours. If you are having problems with VNC you should ensure that you have checked this option first. Request Shared Session allows you to connect to a VNC server with one or more other VNC user. Ordinarily VNC will disconnect any clients who are active when you connect. View Only more ignores inputs from the Stylus and Keyboard of the Handheld PC allowing the user to simply observe Click OK when you have finished specify options. Now that you have setup the VNC Viewer for this session, click OK to connect to the server. If a connection can be created successfully you will be presented with the password prompt, after which the VNC session will begin.
Using a VNC session is just like using your Handheld PC, except some commands will not be sent to the remote system. Commands such as Ctrl + Alt + Del will be picked up by the Handheld PC, displaying the Windows CE Task List. As a result, a number of the most commonly requested commands for remote systems can be found on the Keys menu in the VNC Viewer. Selecting Ctrl + Alt + Del from this list will send the CAD command to the remote system. All other commands are identical to normal Handheld PC functions, such as Alt + Tap for Right Click. To change the options for a VNC session choose Options from the 'Connection' menu. The end a VNC session choose close from the 'Connection' menu. See AlsoRealVNC Home Page: http://www.realvnc.com/ |