How to installing a VNC Server under LinuxCESD|200062Applies To
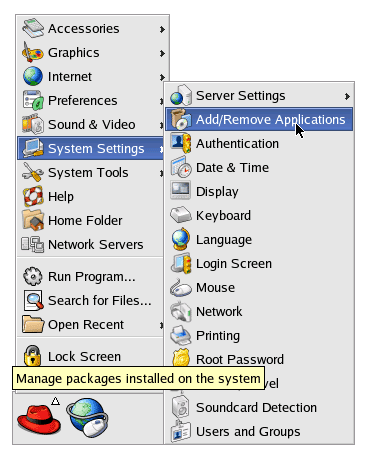
OverviewIf you wish to connect to your Host system or a remote computer using the Virtual Network Computing (VNC) protocol you will need to install the VNC server on the target system. This beginners guide covers how to install the Windows VNC Server under RedHat Linux 9. The steps may be similar under previous versions. The commands involved will be the same under any Linux distribution. How-to GuideThis is a basic beginners guide on installing VNC Server 3.3.7. Securing VNC connections and more advanced server features are beyond the scope of this article. Should you require more advanced information on the use of VNC please see the RealVNC web site. A URL is available at the end of the article. This guide covers how to manually start VNC server sessions. Automatic VNC Server sessions are beyond the scope of this article. System RequirementsVNC Server does not require a very fast computer to operate. It will run under a 486 DX2, however you must allow for some increased lag between the system performing an operation and VNC displaying it. For optimal performance HPC:Factor recommends a PII 350MHz or higher. DownloadVNC Server is available for free from the RealVNC web site (Link at the end of the article). VNC is distributed under the terms and conditions of GNU General Public License. You must accept these terms before installing the software. However RedHat also ships with VNC on the CD. For beginners we recommend installing this version. This guide covers the processes involved in installing and configuring the RedHat distribution. Installing VNC ServerLog into RedHat under the Root (Administrator) account. Open the Main Menu. Select System Settings and finally Add/Remove Applications
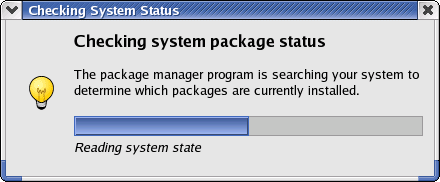
RedHat Package manager will now scan your computer to see what packages (programs) are installed on it. Depending on the speed of your computer this could take a couple of minutes
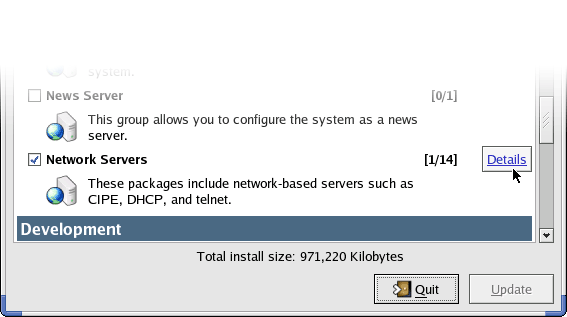
Scroll down the list until you see the Network Servers entry. If it isn't already, place a tick in the box and then click on details.
A list of available program will be displayed, scroll down until you see 'vnc-server - A VNC Server'. Place a tick in the box to the left of the program to allow VNC to be installed. If you didn't have any other previously installed components from the Network Server category you should insure that you do not installed any additional software from this list unless prompted to do so by RedHat.
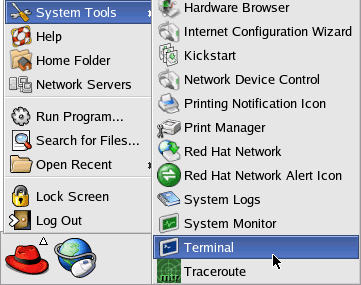
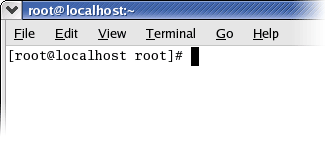
Click Close and then Update to begin the installation process. You will be prompted for one of the RedHat ISO CD's. Starting a Linux VNC ServerNow that you have installed VNC Server you must start a VNC Desktop. Open the Main Menu and choose 'System Tools' and then Run 'Terminal'
Terminal is the Linux name for a Windows Command Prompt. You now need to instruct Linux to load VNC Server and configure an X Desktop for remote access.
VNC Server under Linux supports a wide range of advanced commands. The full range of available commands is beyond the scope of this article. Only the basic commands that will get you started using VNC are covered here. For a full list of commands, at the prompt type: vncserver -? To configure a VNC Server desktop you can do so using the following commands:
Formatting Syntaxvncserver [:<number>] [-name <logical-name>] [-depth <depth>]
[-geometry <width>x<height>] Example:vncserver :1 -name RedHat -depth 16 -geometry 1024x768
In this example a VNC Desktop will be created named "RedHat". It will use a colour depth of 16-bit (65,536 Colours) and have a resolution of 1024x768 pixels (XGA). If you have just installed VNC we recommend that you use our example from above to create your first desktop. Confirming that the server command worked: If the command was successful in the terminal window you will see the following New 'X' desktop is <machine name>:#
Starting applications specified in /root/.vnc/xstartup Log file is /root/.vnc/<machine name>:#.log [<username>@<machinename> root]# Congratulations you have now established a VNC Server Desktop under Linux. You can use the Windows CE VNC Viewer to connect to your Server. Under Linux the password for the VNC Server is anchored to your user account. As long as you have a user account on the computer, you can log in using the same credentials that created the VNC Server session. NB: You should not perform a VNC Server session using the Root account as this poses a security risk. Disabling a VNC ServerIf you wish to terminate a VNC server, type the following command at the prompt: vncserver -kill :#
The VNC Server operating on the specified port number will be terminated See AlsoRealVNC Home Page: http://www.realvnc.com/ Tags | Guide Linux RedHat VNC VNC Server
|