|
Moderator H/PC Vanguard Posts: | 2,826 |
Location: | Choking on the stench of ambition in Washington DC | Status: | |
| Just extraordinary. What a pleasure to follow your work. Re: the ASUS EEE keyboard. I remember complaints about the keys not always making proper contact, and the primitive workaround was to lay several sheets of aluminum foil underneath the key assy.
Yes, that's my contribution to all your work: several sheets of aluminum foil. Now I feel as if I've built this myself 
Jake
|
|
| |
|
Subscribers H/PC Vanguard Posts: | 3,678 |
Location: | Japan | Status: | |
| I found another neat one that you can build today.
Instructions on how to build:
https://www.instructables.com/DIY-Ultra-Portable-Raspberry-Pi-Laptop...
It reminds me of those NVIDIA Shield Portable from some time ago. Edited by stingraze 2021-03-21 9:42 PM
|
|
| |
|
Factorite (Elite) Posts: | 147 |
Location: | United Kingdom | Status: | |
| Quote Jake - 2021-03-10 10:00 PM
Just extraordinary. What a pleasure to follow your work. Re: the ASUS EEE keyboard. I remember complaints about the keys not always making proper contact, and the primitive workaround was to lay several sheets of aluminum foil underneath the key assy.
Yes, that's my contribution to all your work: several sheets of aluminum foil. Now I feel as if I've built this myself
Jake
Thanks Jake! I have a second EEE PC keyboard on hand, mostly because I'm scared I'll tear the ribbon cable while I'm messing with the parts - I'll certainly be on the lookout for this issue.
I've made a little more progress - The base part is now largely complete bar some minor wiring, and most of the lid casing is done. Just the hinge assemblies and the cables to the screen to go.
Photos below:
Top - Base and lid sections
Bottom - Rear of lid section showing LCD controller board  (Case Base and Lid.jpg) (Case Base and Lid.jpg) (Lid Rear.jpg) (Lid Rear.jpg)Attachments ----------------  Case Base and Lid.jpg (91KB - 0 downloads) Lid Rear.jpg (89KB - 0 downloads) Case Base and Lid.jpg (91KB - 0 downloads) Lid Rear.jpg (89KB - 0 downloads) |
|
| |
|
Subscribers H/PC Vanguard Posts: | 3,678 |
Location: | Japan | Status: | |
| Cyberdeck I found on YouTube with a wide screen like H/PCs!
Very cool.
3D printer file here:
https://thangs.com/ZackFreedman/Voidstar-Data-Blaster-Mk1-12969Edited by stingraze 2021-04-10 1:56 PM
|
|
| |
|
H/PC Elite Posts: | 660 |
Location: | Florida, US | Status: | |
| I absolutely LOVED the screen he used on this project. I wonder if it fits on a J728 case. Even if it doesn’t, it could be an awesome candidate for a homebrew modernized J720 using the J720 keyboard with a Pi4 inside talking to this neat screen. That’s reeeallyy cool! |
|
| |
|
Administrator H/PC Oracle Posts: | 17,976 |
Location: | United Kingdom | Status: | |
| The screen appears to be:
Wisecoco 6.86 inch Stretched Bar Lcd Screen With Touch Control Board - https://www.aliexpress.com/item/1005001470561851.html?spm=a2g0s.9042... |
|
| |
|
Subscribers H/PC Vanguard Posts: | 3,678 |
Location: | Japan | Status: | |
| @ntware Yes, it‘s very nice!
@C:Amie:
There are displays like these on Alibaba. Typical use case for those horizontally wide displays nowadays are digital car mirrors, it seems.
Another one, but 9.1 inch.
https://wisecoco.en.alibaba.com/product/62245582073-810063127/9_1_in...Edited by stingraze 2021-04-10 3:31 PM
|
|
| |
|
Factorite (Elite) Posts: | 110 |
Location: | Michigan | Status: | |
| I've just read through all 16 pages of this thread. Things sure have changed in the 3D printing world in the last 5 years. You guys are doing some incredible work. I am totally impressed. Thanks for sharing!
Mike... |
|
| |
|
Factorite (Elite) Posts: | 147 |
Location: | United Kingdom | Status: | |
| Mini-update on my HPC project:
It's not far off done, mostly functional now - I have the following left to do:
- Screen brightness control - This will be done by operating the screen controller's button inputs from the Raspberry Pi's GPIO pins - needs wiring in and a little bit of code to drive the controls from the screen brightness buttons on the keyboard.
- Speakers - Just wiring them to a connector to plug into the screen controller board
- Printing the buttons for the trackball
- Writing a modified version of my 'suspend mode' program
- Writing or adapting a program to display battery status (using the i2c interface on my battery management board )
Unfortunately I can't run it assembled just yet as I mis-wired the mini-USB connector for the keyboard and put glue-lined heatshrink over it. Waiting on some spare connectors to arrive then I can do a full assembly. Quite annoyed with myself there!
See below for a photo of its current state.
 (HPC Mk5 nearly done.jpg) (HPC Mk5 nearly done.jpg)Attachments ---------------- HPC Mk5 nearly done.jpg (94KB - 0 downloads) |
|
| |
|
Factorite (Elite) Posts: | 110 |
Location: | Michigan | Status: | |
| I am starting to collect parts for a new handheld PC. It's going to be a simple thing... I can't create masterpieces like Roberto does!
5" screen
Rii X8 keyboard
RPI 4B
heat sinks
30x30 fan
10000mAh battery slim portable charger
Now I just need a design that I can print! Ha! I did manage to design and print the fan mount. It's a start!
Mike...
 Edited by mikeschn 2021-04-12 12:14 AM Edited by mikeschn 2021-04-12 12:14 AM
|
|
| |
|
Factorite (Elite) Posts: | 110 |
Location: | Michigan | Status: | |
| So I spent a few minutes this evening trying to package some of the components...
Unfortunately there is nothing "thin" about this design...
I have the battery in the bottom, so the weight counteracts the weight of the RPI4 in the top...
I don't have the keyboard yet, so that's not in the picture...
Any suggestions?
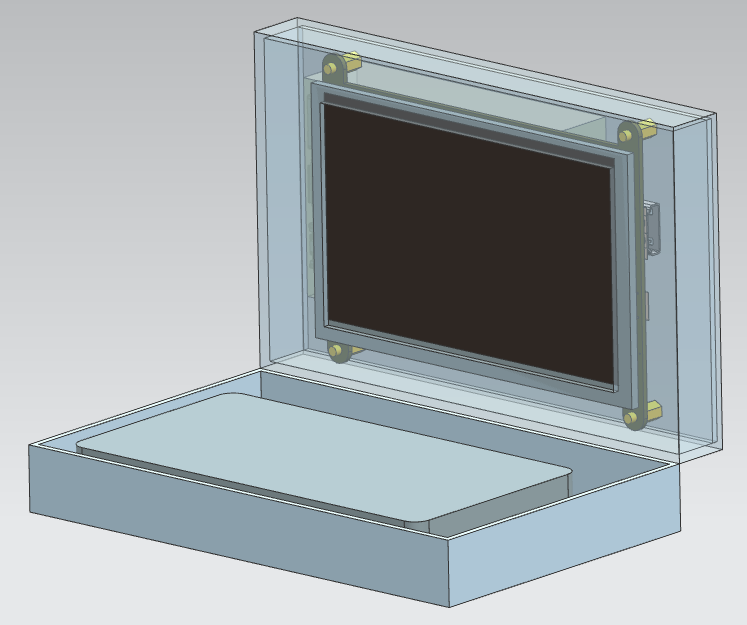
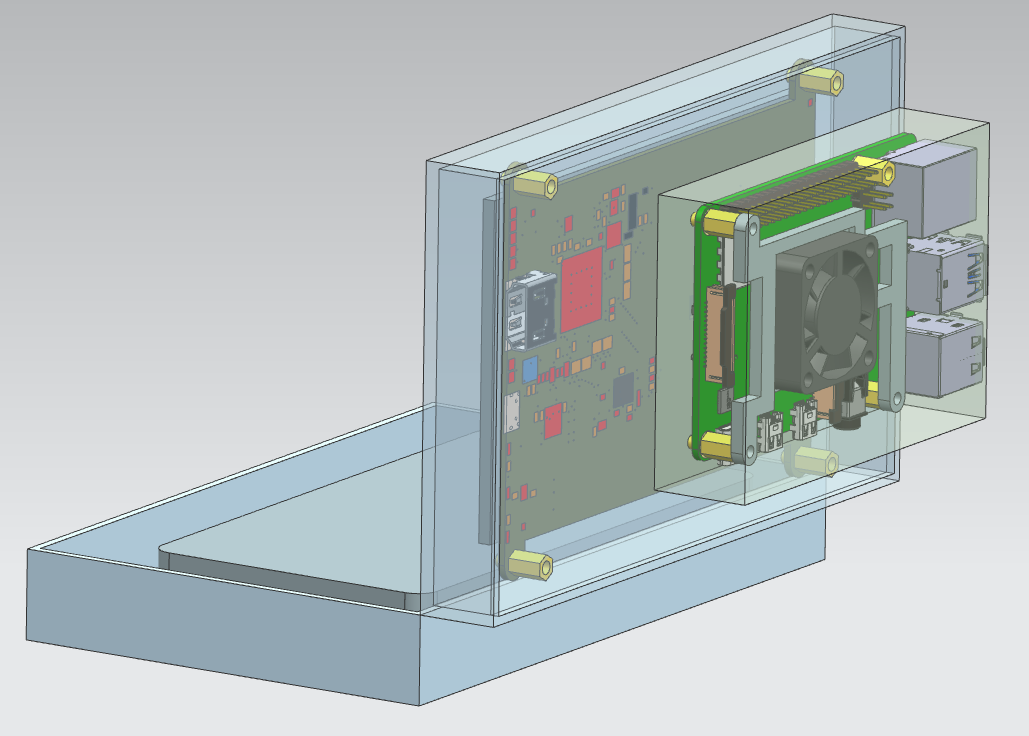
Mike... |
|
| |
|
Factorite (Elite) Posts: | 147 |
Location: | United Kingdom | Status: | |
| Quote mikeschn - 2021-04-12 11:58 PM
So I spent a few minutes this evening trying to package some of the components...
Unfortunately there is nothing "thin" about this design...
I have the battery in the bottom, so the weight counteracts the weight of the RPI4 in the top...
I don't have the keyboard yet, so that's not in the picture...
Any suggestions?
Mike...
First off, it's great to see someone else working on building a HPC - Although it may be thicker the smaller footprint of your device may well make it more portable than mine. If anything I wish I'd spent less time trying to package all my components into ever thinner bodies and got on with turning out something I could start experimenting with.
One suggestion I'd make is - Depending on how many USB devices you're planning on running from the Pi, you might get a neater layout by powering the Pi through its GPIO pins and using the USB-C port as a USB (2 ) host port - I've run a 4-port hub from mine and all the internal peripherals (screen, keyboard etc. ) connect to this, leaving the main USB ports free and avoiding awkward cables. It's just a line in your config.txt file to activate this.
I like your inclusion of a fan by the way - The Pi 4 can certainly get warm under load!
Edited by robertojones 2021-04-13 9:11 AM
|
|
| |
|
Subscribers H/PC Vanguard Posts: | 3,678 |
Location: | Japan | Status: | |
| Quote mikeschn - 2021-04-13 8:58 AM
So I spent a few minutes this evening trying to package some of the components...
Unfortunately there is nothing "thin" about this design...
I have the battery in the bottom, so the weight counteracts the weight of the RPI4 in the top...
I don't have the keyboard yet, so that's not in the picture...
Any suggestions?
Mike...
Wow! the 3D CAD looks great! I wish I knew how to do those.
Do you know there is a flat version of Raspberry Pi 4 called Compute Module 4 without the ports?
It seems many makers are making I/O board with a different dimension than the normal Raspberry Pi 4, you could look into those.
Example (for pre-order ):
https://www.raspberrypi.org/products/compute-module-4-io-board/
Really cool carrier board for Compute Module 4 with M.2:
https://www.jeffgeerling.com/blog/2021/m2-on-raspberry-pi-tofu-compu...
This board (TOFU ) selling at:
https://store.oratek.com/
Edited by stingraze 2021-04-13 11:48 AM
|
|
| |
|
Factorite (Elite) Posts: | 110 |
Location: | Michigan | Status: | |
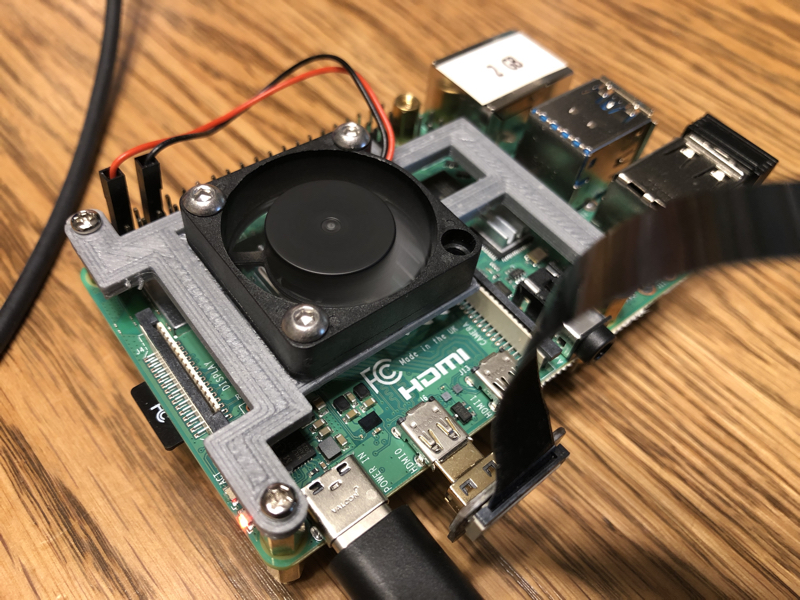
| Stingraze...
There certainly lots of RPI options out there... Jeff Geerling has the CM4 with a PCI card and a gumstick in it... (Gumstick = M.2 NVME SSD )
I notice you have a RPI4 with the Ice Cooler on it. Nice. I have one as well. But it needs a case. Maybe you should print something like this...
https://www.instructables.com/DIY-Raspberry-Pi-Desktop-Case-With-Sta...
Or since you have an M1 Mac, maybe a little brother to go along with it...
https://www.thingiverse.com/thing:3895747
Mike... |
|
| |
|
Factorite (Elite) Posts: | 110 |
Location: | Michigan | Status: | |
| Roberto,
The hub is certainly a good idea, especially if I bury the RPI deep inside the case, and need some ports... For this 5" Mini Laptop, I am going to try to keep it simple, so that I actually complete it. Right now I am mulling if I want to run the USB cable for the powerpack through the hinge, into the top, or just pop a couple holes in the back.
Yeah, I kinda like to run cool, so the fan is definitely a must for me. I would have liked to put the ice cooler on it, but there is no room! Ha!
Do you have easy access to your µSD card, or are you booting from an SSD? For this build I am planning on using the µSD, but it would certainly be easy enough to add an SSD above the RPI. Yeah, I'll keep that in mind as I work on the design.
Didn't have any time to design today, had to work! 
Mike... |
|
| |


