Ten Tips, Tricks, and Uses for GSFinder+Julio Ortiz | Handheld PC Writing Team If you own a Handheld PC, there are several options for Windows Explorer replacements, because let’s face it: the built-in Windows CE explorer is pretty anemic. The two Explorer applications that come to mind are Total Commander CE and GSFinder+. As a matter of preference, I use the curiously-named GSFinder+ (due to Finder being the MacOS file / folder application) as my main file explorer. This is because it offers so much more than what comes standard with Windows CE (in fact, the only feature I wished it had over Total Commander CE is FTP support), it is the slickest-looking of the bunch, and it is free. So, with that in mind, here are ten tips, tricks, and uses that will hopefully help you get more out of GSFinder+. 1. Removing the “Shortcut to…” prefixSimilar to a popular feature in the TweakUI utility for desktop Windows, GSFinder+ has an option to remove the annoying “Shortcut to...” prefix. This is enabled under Tools > Options, and you will find the option under the View tab. 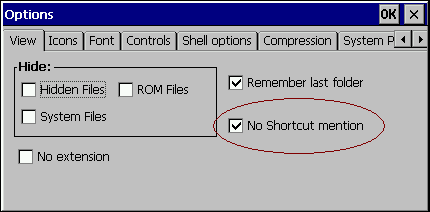
2. Use “Backspace” to up a folder levelSimilar to regular Explorer, GSFinder+ supports the Backspace shortcut in the right folder pane. 3. The SendTo folderAnother great option inspired by the desktop: GSFinder+ allows you to set a folder in which to place shortcuts to send applications to (say, open a text file with Pocket Word). To set it up, go to Tools > Options, and tap on the Shell Options tab. 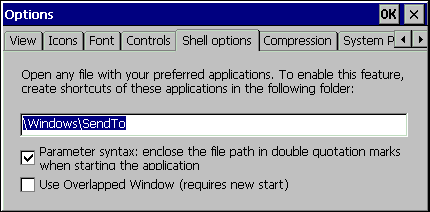
Two things to note when enabling this feature. First, the SendTo folder does not exist or is created by turning this feature on. You have to manually create it. Second, any shortcuts you place in this folder are not seen by GSFinder+ until you restart the application. 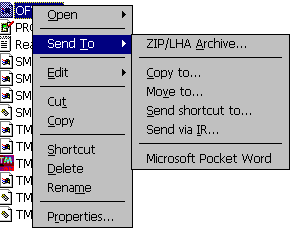
The shortcuts appear at the bottom of the menu. The built-in Send To items include some power abilities, like zipping and sending shortcuts to the desktop. 4. Replace the desktop computer icon with GSFinder+There’s no better way to get used to using GSFinder+ as getting rid of the standard “My Computer” icon and placing GSFinder+ in its place. Use an application such as SmallTweak to hide the desktop icon by unchecking it. 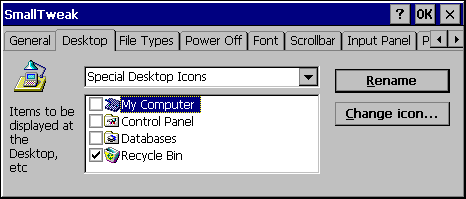
Then place the GSFinder+ icon in its place on the desktop and allow your reflex memory to do the rest. 5. Built-in File Association ToolGSFinder+ has a built-in tool to add and edit file associations. To use it, go to Tools > Options, and then click on the right-arrow until you come to the last tab, File Types. 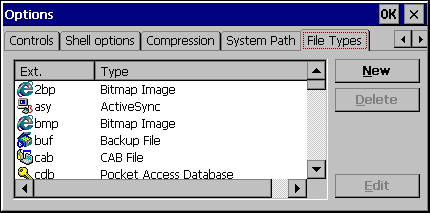
6. Built-in ZIP and UnZIPGSFinder+ contains built-in support for the popular file compression format ZIP and the lesser known LHA. To configure these settings, go to Tools > Options and tap on the right-arrow until you reach the Compression tab. 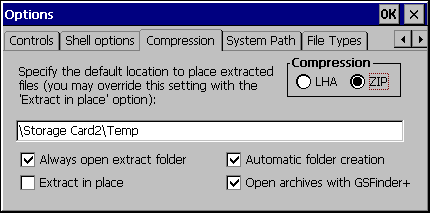
7. Quick PathsLocate a file and tap on it. Then tap on Edit . You will see two options that are no longer grayed out: Copy Path and Copy Name. The former is the most useful: it will copy the complete path, including file name, to memory. This is good if you are documenting or trying to script something. The latter option copies the file name alone to memory. 8. File SearchThe standard CTRL + F shortcut brings up File Search dialog box. 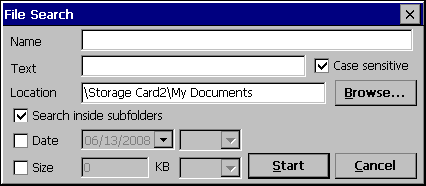
In the folder tree on the left-side of the application, File Search is at the bottom, acting as a sort of virtual folder. The results of a search remain here, even if you switch to different folders and come back. The search features are fairly flexible. You can look for a specific file name or use wildcards. You can also search for text inside files; this includes Word documents. You can also search based on size and date. The search feature is fairly quick in returning file name searches. One flaw of the search results is that the path of the file is not displayed. However, using the Copy Path Name option listed above, you can quickly discover the file’s location. 9. Drag and DropYou can drag and drop files in GSFinder+. You can also enable drag and drop to act the same as right-click drag and drop. To go Tools > Options, and select the Controls tab. Here you can check off Always show a context menu for ‘drag and drop’. 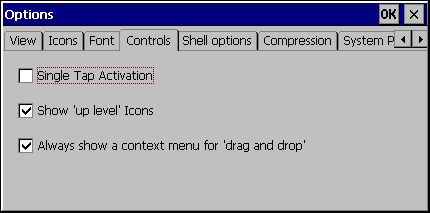
10. Command Line ArgumentsHere’s a tip that could be useful for scripting: GSFinder+ accepts command line arguments in the form of paths, allowing you to open right to a specific folder. In the Start > Run box, entering the following (your application path may differ): “\Program Files\GSFinder\GSFinder.exe” “\Storage Card2\My Documents” … opens GSFinder+ right to that folder. I hope that you have enjoyed these tips. Feel free to share your own! Want to let us know what you think of this article? Let us know your thoughts on "Ten Tips, Tricks, and Uses for GSFinder+" in the discussion therad in the Community Forums! |
