Review
Ruksun Expense Force 20 February 2006 Cost: Free Freeware HPC:Factor Rating
Find out more View Ruksun Expense Force in the Software Compatibility List. Discuss this review Let us know what you thought in the community forums. About The Author Latest Reviews
| Ruksun Expense Force 1.1John Ottini | Handheld PC Reviews There is a humorous line from a Robert Palmer song that always reminds me how important it is to keep track of my financial expenses. "She's so fine, there's no telling where the money went?" Interestingly, before embarking on my latest vacation I came across a nice little expense-tracking program called Expense Force by Ruksun Software Technologies. It's by no means a new program, but up until now, I have stayed away from using expense trackers because I have always found them to be either too time consuming or overly complicated (or a bit of both). My idea of a useful expense tracker is one that requires minimal setup and allows you to enter expense information quick and easy. I don't want or need to spend my precious business or vacation time, stirring at my H/PC, searching through multiple forms - inputting data. My initial impression of Expense Force was that it would not require much setup work on my part and be fairly straightforward to use for my everyday purposes. What I discovered could best be described as a 'mixed blessing' of good functionality and unfulfilled expectations. Setting Up Your Expense PageExpense Force stores all of your entries in Expense Pages, so your first task involves creating a new Expense Page. This consists of, first choosing a Name for your Page, then selecting a Password (optional) and finally, setting the currency type you will be using for your entries. Once you complete this process, the software automatically takes you to the Daily View form, which includes (by default) 5 categories: Description, Mode of Payment, Expense Category, Amount and Note. Before beginning your expense entries, you will want to choose which category you wish to use when sorting your entries. You will also want to configure the Mode of Payment (cash, check, credit card etc) and Expense Category (Dining, Gift, Fuel, Accommodations etc) to suit your specific needs. Selecting the Configure option in the View drop down menu will allow you to quickly perform both of these functions. Once you've completed this final task, select Insert from the Edit menu and you are ready to begin populating the categories with your daily expenses. Daily and Weekly ViewsThere are two views available within Expense Force - Daily and Weekly. The Daily View presents you all of your detailed expense entries for any one given day, while the Weekly View is used to quickly peruse your total expenses for each day within any chosen week. Double tapping on an entry in Daily View allows you to edit that entry, while double tapping on any day in the Weekly View will take you to the Daily View and display a list of entries for that day. 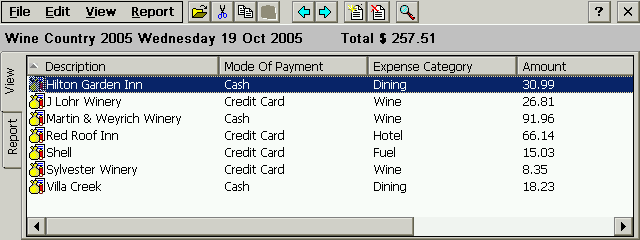
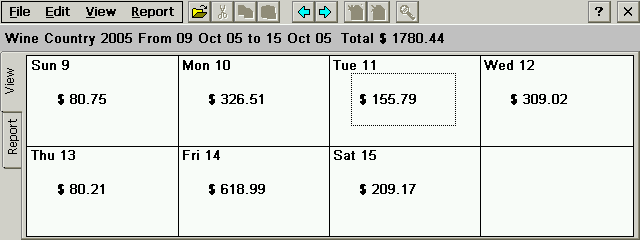
Moving About Your PageExpense Force provides you with several ways to move about within the software. There are right and left arrow icons, which allow you to move to and from previous days or weeks. There is a Find function in Daily View, which lets you quickly locate any expense entry, using a text search. You can also Jump to any Date (you select) or Jump to Today(s) date from anywhere in the Expense Page. What is an Expense Tracker without a Report Generator?The strength or weakness of any Expense Tracker is how well it generates Expense Reports. Expense Tracker automatically generates the following reports If you have a look at the screen shots below, you'll notice that information provided within each Report is pretty self-evident. The only one I've left off is the Total Expense Report, which consists of a single line, showing the grand total of all your expenses. 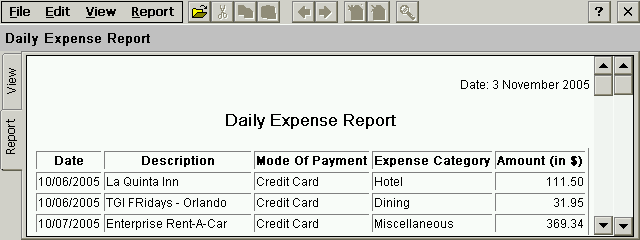
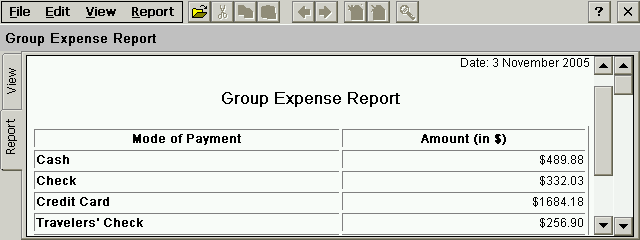
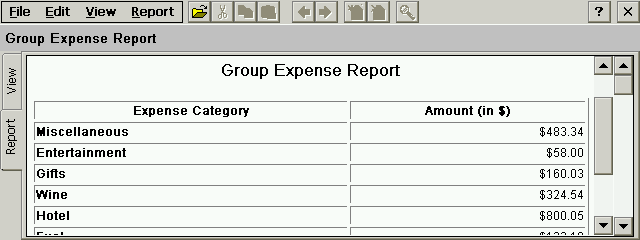
The Reports themselves contain a mixed bag of good and bad features! On the one hand, they are easy to generate because Expense Force automatically does all of the work for you, therefore you don't have to know much about Report creation. The Reports look very professional, so for those of you (like me) who want 'quick and easy', these canned reports will work just fine. The software does allow you to sort and filter information, which means that you do have some control over what is displayed in the Reports! 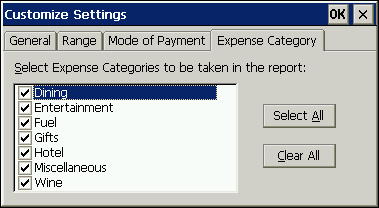
On the other hand, if you are looking for more flexibility and customization, you will probably be disappointed with this software! Expense Force does allows for some minimal Report customization, but what you see, is pretty much what you get. Unexpected DiscoveriesThere are a couple of important items I discovered when using Expense Force that bare mentioning. The built in help files, indicate that you can customize the Report Headings, (for example - from the standard heading of Daily Expense Report to John's Daily Expense Report), but what they don't mention is that the changes are only temporary. Once you exit the software and then reopen the program, the Report Heading defaults back to the preset name. The other odd item, which may or may not be a big deal to some users, is the software's inability to print Reports or Expense Pages from within the program. Your only option is to export the Reports as HTML files, or CSV files and then print them, using other software. I found it strange and perhaps shortsighted that the developer never provided a print option; I'm not too sure what they where thinking? Final Thoughts?If you're looking for a basic, easy to use expense tracker and you are willing to overlook some of the shortcomings, then Expense Force is definitely worth a look. Personally, I found this software to be quite adequate for my meager needs and the since Ruksun chose to make this software available as freeware, it's difficult to complain too much about this software's deficiencies. Note: There is no users manual (PDF or otherwise) provide with this software, but the built-in help files do a fairly good job of explaining the ins and outs of this program. System RequirementsWindows CE 2.0, H/PC Professional, HPC2000, Windows CE 4.x .net More information on Ruksun Expense Force can be found at Ratings
Further DiscussionLet us know what you thought of this review and the Ruksun Expense Force in the Community Forums! |