Using HPC:Factor CAB MakerCESD|200266Applies To
OverviewThis article outlines how to use the HPC:Factor CAB Maker Web Tool. View: HPC:Factor CAB Maker (beta) More InfoThe CAB Maker web tool is an online installer file generator for Windows CE 2.0+ devices. The tool can be used to package basic Windows CE applications, resource files, registry keys and shortcuts into an automated 'cabinet' installer / uninstaller package. Who might find the CAB Maker useful?CAB Maker may be of use in the following scenarios
Does CAB Maker support Windows CE 1.0 / 1.01?No. Windows CE 1.0x does not support CAB installers. Who can use CAB MakerCAB Maker is available to any subscriber level member of the HPC:Factor community. At the current time Bronze level members cannot remove HPC:Factor branding from the Developer identity shown in CAB Maker. All higher-level members can use CAB Maker without restrictions. Are there any restrictions?There are currently no limits on the number of times that a member can use the tool. the maximum permitted individual file size is currently 20MB. CAB Maker can only create a CAB file for one CPU Architecture at a time. In order to create a second CAB file for a difference CPU (e.g. to switch from StrongARM to SH3) you will either need to delete existing files and re-upload the new versions or click on the "Delete files and start-over" button to clear the current project and create a new one. The single CPU model is intentional by design as CAB Maker is supposed to be a simple to use environment. Allowing the creation of multiple installers and architectures at once would make it considerable more complex and less approachable. Do you keep my data?No. Your file data will be deleted automatically from CAB Maker when you click the "Delete files and logout" button or will be scavenged from the HPC:Factor servers after 60 minutes if you fail to click on the log-off button. How ToThe following section outlines how to use CAB Maker. The CAB Maker user interface is broadly grouped into 4 sections
App Info
Developer Name: This is the company who produces the app e.g. HPC Factor, Microsoft or Phatware. Application Name: The name of your program e.g. Pocket Internet Explorer, Pocket Word or Calligrapher 6.5. The Application Name is available to use elsewhere in CAB Maker using the %AppName% Macro. Block Install On: Allows you to expressly forbid the CAB from being used on the selected Windows CE Platforms. The user will be presented with a compatibility warning if they attempt to run the CAB on an unsupported Plarform. Architecture: First select the type of device you are creating a CAB for i.e. Handheld PC, Palm-Sized PC or Pocket PC. This will adjust the Maximum/Minimum version numbers accordingly. Base Install Path: This is the default path that your application will copy files to. In most cases it will be a sub-directory under 'Program Files' in the format developer\application. As you populate the Developer Name and Application Name, CAB Maker will suggest an appropriate default value for you. You can override and change this value as required. The Base Install Path is available elsewhere in CAB Maker using the %InstallDir% Macro. FilesThe Files section is where you attach CPU and Non-CPU specific files for your application. A Windows CE CAB file can support up to 999 files. CAB Maker restricts each individual file to a maximum of 20MB. To upload a file you can either click on the drop-zone to upload individual files, or, to upload multiple files at once you can drag and drop them into the drop zone.
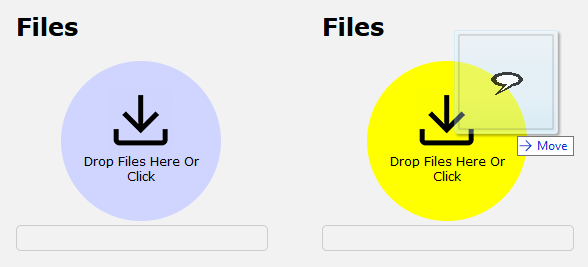
Note: Not all web browsers support drop-zone based file uploading. If the drop-zone turns yellow when you drag a file(s) over it, then your browser will most likely support drag/drop uploading. Please note that you cannot upload folders, only files. Windows CE CABs do not support folders or sub-folders. Once you select a file or drag one or more files into the drop-zone, the progress indicator and log will show the upload process and notify you once the upload is completed. As each file uploads, it will appear in the files list to the right of the drop-zone where you can configure its properties.
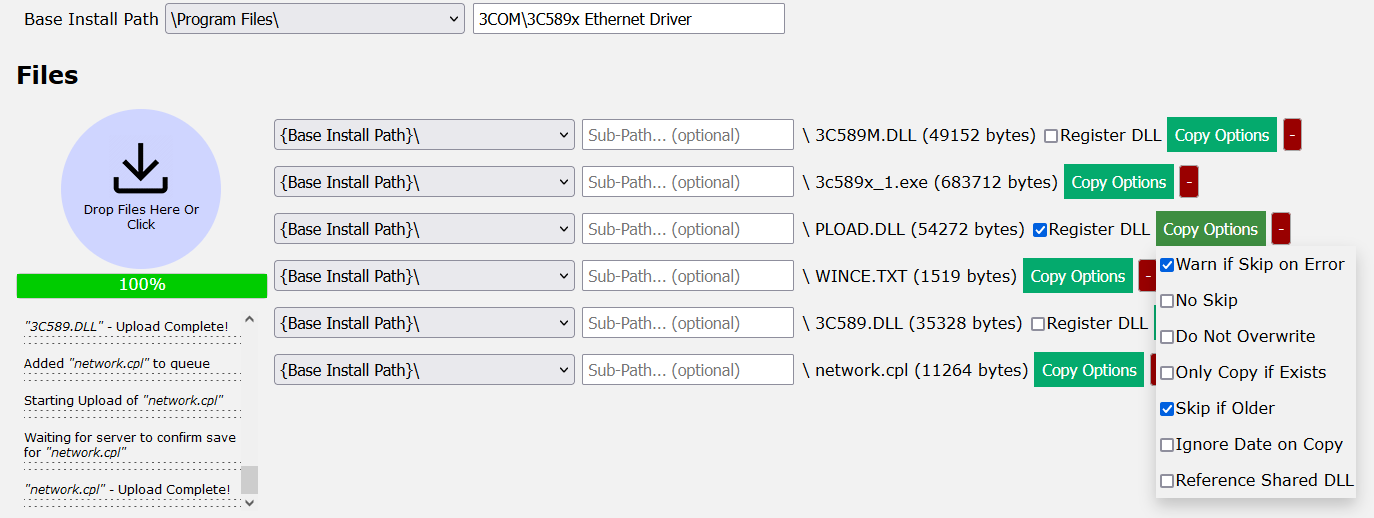
Path Dropdown: The Path dropdown will default to the "{Base Install Path}\" option. This will copy the file to the directory entered in the Base Install Path in the App Info section i.e. '\Program Files\3COM\3C589x Ethernet Driver' in the example above. To specify a fully custom path, select either "{Base Install Path}\" or "\" and then type the remainder of the path in the 'Sub-Path... (optional)' box. All of the other values are operating system macro's and cannot have a sub-path appended to them. Sub-Path... (optional): This allows you to specify a more exact Windows CE file system path in the format of "folder\sub-folder". For example in the example above, the file 3x589x_1.exe will be copied to '\Program Files\3COM\3C589x Ethernet Driver\Util' Filename: This is the filename of the file that you uploaded. You cannot change the filename in CAB Maker. Please ensure that the file is correctly named before uploading. Register DLL: The register DLL option will only appear if a DLL file is uploaded. Ticking the DLL will cause the installer to execute the self-registration export function of the DLL file. This is usually used to write configuration settings into the Windows CE registry. Not all DLL files support self-registration. Your installer will fail if the DLL does not support registration. Copy Options: If you hover the mouse over the Copy Options button, a drop down will appear. The options in this list let you customise the file copy settings for each file individually. By default, CAB Maker sets files to alert the user if the installer cannot copy the file (usually because it is currnetly open in another application) and will not attempt to overwrite a newer file with an older one. You can set the installer to make it impossible to skip copying the file, tell the installer to never overwrite any existing file, to only overwrite it if it already exists and to ignore the file data on copy (i.e. always overwrite). The Reference Shared DLL option in theory allows you to run two versions of the same DLL simultaneously, however its usefulness of Windows CE is believed to be limited. <Delete>: The red '-' button removes the file from the list and deletes it from the CAB Maker server. File CopyingAt the current time, options to override the file copy behaviour are not available in CAB Maker. By default all file copies are set to prompt the user for instructions (overwrite, skip or cancel install) if there is a conflict and to not attempt to copy the file if there is currently a newer version already present in the file system. RegistryThe registry section is the most complicated part of CAB Maker. This is where you can specify configuration and app-default settings for the program or wider system/user profile. Click on the 'Add Registry Setting' button to add a new registry entry.
Each registry setting is divided into 6 parts Hive: This is the root element of the registry path. HKEY_LOCAL_MACHINE is used for system-level settings. HKEY_CURRENT_USER is used for user-level settings for the current logged-on user and HKEY_CLASSES_ROOT is used for DLL's and creating file extension registrations. HKEY_USERS is seldom (if ever) used on Windows CE and is as HKEY_CURRENT_USER but for logged-out users. Path: The path is the "folder" structure to where the key should be stored e.g. SOFTWARE\Microsoft\Windows\CurrentVersion\Explorer Key Name: This is akin to a "file" found in the "folder" specified by the path. A Path can contain multiple (or no) keys. Generally speaking, registry keys do not contain spaces, however this is not always the case. If you wish to use the 'Default' value - often referenced in .REG files as the '@' value, simply leave the Key Name field blank. Type: The data type being used. CAB Maker supports four data types: REG_SZ: A single line string value. REG_MULTI_SZ: A multi-line string value. REG_BINARY: A hexadecimal representation of a binary file/value. REG_DWORD: A 32-bit numeric value. Value: Your data, formatted in line with the requirements of the Type as listed above. For string values, you can use a macro substitution variable as follows
Overwrite: Specify whether or not to overwrite an existing key if one already exists. By default all settings will be overwritten. <Delete>: The red '-' button removes the registry entry from the list.
ShortcutsShortcuts allow you to place system shortcuts on (usually) the start menu or desktop.
Shortcut Name: The friendly name / label of the shortcut as it appears to the user Location: Select a pre-defined path macro or choose "\" to enter your own custom path via the 'Sub-Path... (optional)' box Sub-Path... (optional): Enter a custom sub path in the format of "folder\sub-folder" Filename: This cannot be edited. It is the resultant file that the shortcut will point to. CAB Maker will organise the path to the file for you. Creating a CAB fileOnce you have populated all of the configuration values necessary for your program. Simply click on the "Make CAB" button to build your CAB file. The process may take several minutes depending on how large your application is. Please do not attempt to click on the "Make CAB" button multiple times as it will not create your CAB file any faster. While your CAB file is being generated you will see an activity spinner
If your CAB is created successfully, the activity spinner will be replaced with a link to download your CAB file
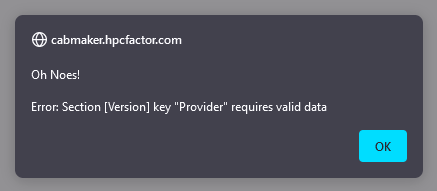
If an error occurs during the build, you will receive a pop-up with details of the error.
In most circumstances an error requiring valid data means that you have got a blank text box that require a value. In the example above, the Developer Name has been left blank. Creating a second CAB for a new ArchitectureOnce you have created your first CAB file. The easiest and fastest way to create the same CAB for a different architecture is to:
Note: CAB Maker does not check that the architecture of the .exe or .dll file you are uploading matches that of the architecture value specified in the 'App Info' section. Troubleshooting
TipsImport/Export Escaping and Escape Characters Copying Files to Root (\) Building for x86 Help & FeedbackIf you require help or wish to offer feedback on HPC:Factor CAB Maker. Please visit the following thread on the HPC:Factor Handheld PC Community Forums. View: CAB Maker Support Thread |