Uninstalling Applications in Windows CE
CESD|200016Applies To
- Windows CE 2.0, 2.0 SP1
- Windows CE for Handheld PC Professional
- Windows CE for HPC2000
Overview
Windows CE allows software vendors to add Uninstall routines to their software. Not all Windows CE software have uninstall options. As a general rule, Operating System updates, Single .exe files and applications that you install from the device itself (single .cab files) do not have Uninstallers. This article discusses the methods by which Software can be removed safely from Windows CE based devices.
How-to-Guide
| |
1. |
|
Option 1: The CE Approach...
If a software program has a Uninstall routine, it will appear as a link from the Remove Programs applet in the Windows CE Control Panel
|
|
| 2. |
|
To access the Remove Programs applet
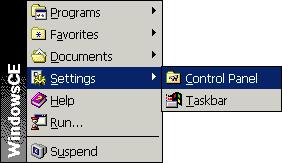
Or you can use the Keyboard Shortcut
Press  + C + C
This will launch the "Control Panel"
For more keyboard shortcuts please see the Windows CE 2 Keyboard Shortcuts page
|
|
| 3. |
 |
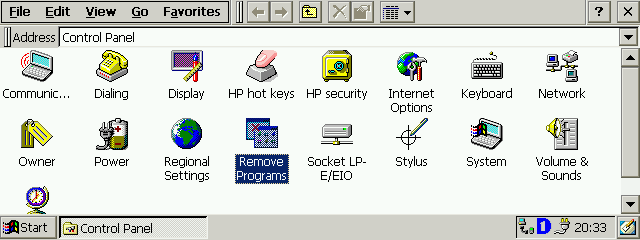
Double Tap the 'Remove Programs' Icon to launch the applet.
|
|
| 4. |
|
Scroll the Programs list until you find the application that you want to uninstall. Highlight it by single tapping the name.
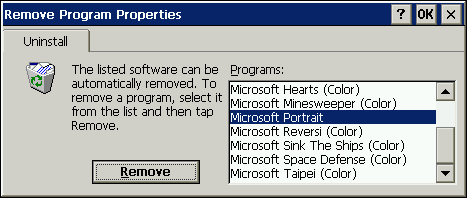
Click the 'Remove' button to begin the Uninstall procedure
NB: In this example, 'Microsoft Handheld PC 2.0 SP 1' is an example of a non-removable utility.
|
|
| 5. |
|
The following dialogue box will appear:
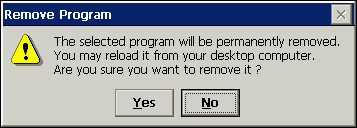
Tap 'Yes' to remove the chosen program or 'No' to cancel and return the the Remove Programs applet.
|
|
| |
| |
|
| |
|
| |
1.
|
|
Option 2: On the Host...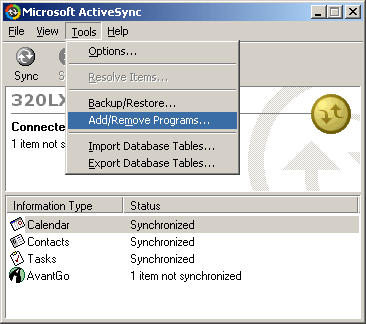
If not already running, start Microsoft ActiveSync
Connect your H/PC to the Host PC system via your chosen connection method
Open ActiveSync and wait until the automatic Profile synchronisation / Data sync has completed.
From the Tools menu select Add/Remove Programs... (As shown)
NB: This example uses ActiveSync 3.5. The process is the same in ActiveSync 3.0 and 3.1. The process may differ slightly using Windows CE Services 2.x.
|
| |
|
| |
2.
|
|
Wait while ActiveSync contacts your H/PC and downloads a list of the software that you have installed.

During the search the profile also checks the local disk of the host PC to see if there are any Software utilities present to Automatically Install or to give the option to install (See Installing on CE 2.0 guide, coming soon).
Depending on your connection speed, this may take a few moments to complete
NB: Before selecting 'Add/Remove Programs...' from the Tools Menu allow ActiveSync to finish its automatic tasks to avoid overloading the connection and potentially loosing data
|
| |
|
| |
3.
|
|
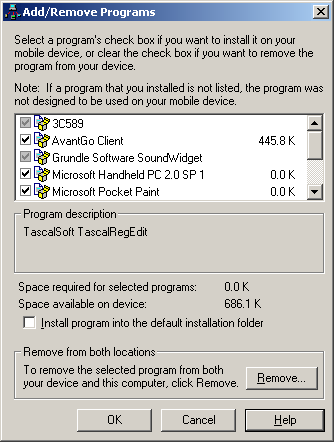 This is the Add/ Remove Programs application This is the Add/ Remove Programs application
.It is similar to the Windows Components installer that comes with Windows 95 / 98 and Millennium. A list of the applications installed, or available to install are presented here. Along with the file size on the H/PC.
To uninstall an application from the H/PC:
-
Remove the Tick from the Box by the application you wish to remove
-
Click the 'OK' button when you are ready to uninstall
NB: The Installation files are left on the Host PC so that you can easily reinstall
To uninstall an application from the H/PC and the Host PC:
-
Select the name of the application you wish to remove
-
Click the Remove button
-
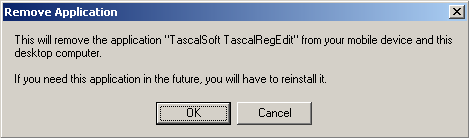
Confirm Application removal (See below)
If the Program you are trying to uninstall has a dimmed tick box, then you must remove the application both from the H/PC and from the Host PC
Click 'OK' to complete the uninstallation process
|