Microsoft ActiveSync Users Guide
CESD|200023Applies To
- Windows CE 2.0, 2.0 SP1
- Windows CE 2.11, SP1
- Windows CE 3.0
Overview
Microsoft ActiveSync is the utility which is used to synchronise files and information between the host computer and its software and the Windows CE device and its component software. A Windows CE based client for ActiveSync is installed as part of the system ROM. This article discusses the Handheld PC ActiveSync client.
How-to Guide
The Client module allows you to invoke a connection and synchronisation to the host computer. The utility is especially useful if you remotely connect to your host PC over a corporate network or by Dial-Up connection. It also forces the ActiveSync host counterpart to check for changes on the portable device
| |
1. |
|
To start the ActiveSync CE Client:
-
Tap on 'Start'
-
'Programs'
-
'Communications'
-
Open 'ActiveSync'
This will launch the "ActiveSync" program
|
|
 |
2. |
|
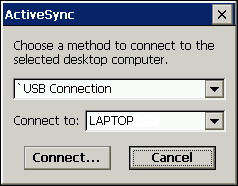
 The first screen enables you to select the connection method by which you wish to synchronise your device. The first screen enables you to select the connection method by which you wish to synchronise your device.
Select your preferred method from the first drop box. The connection options range from the generically available Serial Port and Infrared connections to manual entry's stored your Remote Networking folder (including Dial-Up and Direct Cable Connections)
The option to use an Ethernet Network connection will be displayed only if the correct hardware has been made available to Windows CE.
Finally select the Host computer name that you will be connecting to. Established partnerships are only available in the list. You can not create a new partnership remotely, or connect and sync via a Guest account.
Click 'Connect...'
|
|
| 3. |
 |
 The establishing connection dialogue will be displayed while the computer connects to the host, confirms the device partnership and finally establishes a working connection. The establishing connection dialogue will be displayed while the computer connects to the host, confirms the device partnership and finally establishes a working connection.
This may take some time depending on the chosen method of connection. You will be presented with a connection failure dialogue if your settings are inaccurate or the connection failed.
To abort the Synchronisation click 'Cancel'
|
|
| 4. |
|
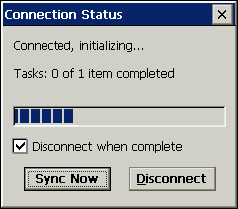
 Once the connection has been established, the ActiveSync Client and the Host computer will analyse the information contained on both machines, and will work out what information needs to be updated. Once the connection has been established, the ActiveSync Client and the Host computer will analyse the information contained on both machines, and will work out what information needs to be updated.
A text readout will display the activity of the Sync Check
You may then choose whether you want to proceed and synchronise the data or disconnect and cancel the operation. You may also choose whether the connection should be disconnected at the end of the information sync by placing a tick in the check box.
Select 'Sync Now' to proceed
|
|
| 5. |
|
 The Synchronisation will begin. The Synchronisation will begin.
The activity of the synchronisation can be monitored by the text readout given at the top of window, and by the moving status monitor below.
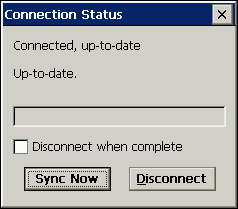
Once all of the files have been transferred the window will display the 'Up-to-date' message. At this point the connection will be disconnected if you chose to automatically disconnect.
To Re-Sync the device tap the 'Sync Now' button. Or to end the session tap 'Disconnect'
|
|
| 6. |
|
You will now find that your data has been synchronised between the device.
You must set-up the ActiveSync Host software and a device Partnership before the Client software can operate correctly
|
|

 The first screen enables you to select the connection method by which you wish to synchronise your device.
 The establishing connection dialogue will be displayed while the computer connects to the host, confirms the device partnership and finally establishes a working connection.
 Once the connection has been established, the ActiveSync Client and the Host computer will analyse the information contained on both machines, and will work out what information needs to be updated.
 The Synchronisation will begin.