x
This website is using cookies. We use cookies to ensure that we give you the best experience on our website. More info. That's Fine
HPC:Factor Logo 
 

Networking Guide: Accessing Network Shares

CESD|200037

Applies To:

  • Windows CE 2.0, SP1 + (Network Service Pack)
  • Windows CE 2.11
  • Windows CE 3.0

Overview:

The article describes how to setup and access a shared File resources on your local network. The two part guide covers the setup of network shares on Microsoft Windows based computers. In the second part, how to access the Network share from your HPC is outlined.

How-to Guide:

Creating a Network File Share on Windows:

Note: Windows CE has no native support for allowing network clients to access the Handheld PC. This section of the guide provides information on Sharing resources on Mainstream Windows Operating Systems.

Windows NT4 / 2000 / XP Professional / 2003

Under Windows XP Professional you can enable advanced file sharing:

  • Open 'My Computer'
  • Select from the 'Tools' > 'Folder Options...'
  • Open the 'View' tab
  • Deselect the 'Use simple file sharing (Recommended)' option
  • Return to Windows Explorer
  1. Open 'My Computer'
  2. Navigate to the Drive or Folder that you wish to share
  3. Right Click the File / Folder & select 'Sharing & Security...'
  4. Select the 'Share this folder' radio button, or if a system share is present press the 'New Share' button
  5. Enter a share name. The name can be made of Alphanumeric characters - and _. They must not contain Spaces or other advanced characters.
    If you wish to see the share listed on your Servers shares list on Windows CE, or you wish to access the share over non-windows and Windows 9x systems the share name may not be longer than 8 characters.
  6. Optionally you can enter a Familiar name for the share to help you and other users identify what it is. For example "Shared Documents Folders"
  7. Press the Permissions button and setup the access permissions for the share. You will need to make sure that the user account and credentials you wish to use to access the share are listed.

Windows XP Home Edition

  1. Open 'My Computer'
  2. Navigate to the Drive or Folder that you wish to share
  3. Right Click the File / Folder & select 'Sharing & Security...'
  4. Place a tick in the 'Share this folder on the network' check box
  5. Enter a share name. The name can be made of Alphanumeric characters - and _. They must not contain Spaces or other advanced characters.
    If you wish to see the share listed on your Servers shares list on Windows CE, or you wish to access the share over non-windows and Windows 9x systems the share name may not be longer than 8 characters.
  6. If you wish to allow network users to change the files and folders on the share, Select the 'Allow network users to change my files' option

Windows 95 / 98 / 98SE / Millennium

  1. Open 'My Computer'
  2. Navigate to the Drive or Folder that you wish to share
  3. Right Click the File / Folder & select 'Sharing...'
  4. Place a check in the 'Shares As' radio button
  5. Enter a share name. The name can be made of Alphanumeric characters - and _. They must not contain Spaces or other advanced characters.
  6. Optionally you can enter a Familiar name for the share to help you and other users identify what it is. For example "Shared Documents Folders"
  7. Select the access type for the share and optionally provide a password for the Access Type


Accessing Network Shares from your Handheld PC:

1.

Windows CE has no native Network Neighbourhood / My Network Places explorer area. In order to access Network Shares you must use the remote computers Universal Naming Convention (UNC) path.

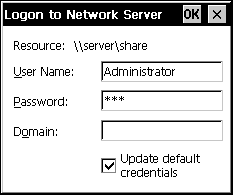
UNC paths enable you to access the Network shares of Remote computers. Windows CE can only access resources which require authentication on a Microsoft Windows based Workgroup or Domain based network.

Universal Naming Convention format:

UNC uses a two level structure to access available resources. The first level of a Network UNC path specifies the Machine Name or the 'Server Name' of the computer on the remote network.

To discover the machine name of a computer you wish to access:

Windows 2000 / XP / 2003

  1. Open the Windows 'Control Panel'
  2. Select the 'System' Applet
  3. Choose the 'Computer Name' tab
  4. The Machine Name is listed in the 'Full Computer Name' area

Windows 95 / 98 / Millennium / NT4

  1. Open the Windows 'Control Panel'
  2. Select the 'Network' Applet
  3. Choose the 'Identification' Tab
  4. The Machine Name is listed in the 'Computer Name' entry

The Machine Name is always preceded by the prefix \\ . For example if the Computer Name of the resource you want to access is 'Inspiron' the UNC name is \\inspiron


The second level of a Network UNC path specifies the remote 'Share Name' that you wish to access.

To discover the name of a remote share you need to access access the Root Listing of the Remote server by simply entering only the Computer name in UNC format. This will present a list of all available shares on the remote computer.

The Share name is always preceded by a \ and by the Machine Name of the computer it resides on. For example if you wish to access the network share 'Data' on the computer 'Inspiron' the UNC address is \\inspiron\data ( \\server\share ).

If you are connecting to a corporate network check with your Administrator for the server and share details.

NB: More information on Creating a Network Neighbourhood / My Network Places explorer for the H/PC can be found in CESD article CESDC0005


2.

On Windows CE Handheld PC's you enter the UNC path information into the address bar in Windows Explorer or Pocket Internet Explorer.

  1. Open Windows Explorer
  2. Tap in the Address bar and clear any highlighted text
  3. Type the UNC name of the resource you wish to access e.g. \\server\share

If you know the server name, but not the share name simply type the computer name of the remote computer e.g. \\server to view the list of shares available on that server.

Example of UNC Entry - \\Server\Share

NB: Windows CE requires that share names conform to the 8 character name limit in order for them to be viewed in the \\Server root. Shares with longer file name may still be accessed by typing the share name into the UNC path.


3. 

Press the Enter key to accept the Network address and send the access request. On some networks and slower devices it may take upwards of 60 seconds for the device to produce a response.

At this stage one of two things may happen, depending on the configuration of the share and server you are trying to access.

  1. You will be granted access to the resource and see the File / Folder list
  2. You will be challenged by the remote system to provide your network credentials

Logon to Network - Credentials Box

If you have not predefined a username and password for network access the above prompt will be displayed asking you to enter your User Name, Password and if applicable the address of the Domain you wish to connect to.

If you wish for Windows CE to save the Authentication information as the default for use on all network access attempts place the check in the 'Update Default Credentials' box and tap OK.

NB: Domain Networks are only possible with a Novell, Windows Server or other Network Operating Systems. Client versions of Windows e.g. Windows 98 and Windows XP can not connect to each other using Domain networking. If your Network has no server you can leave this field blank. In a corporate networking environment contact your Network Administrator who will be able to provide you with the correct authentication details.


4. 

Once Authenticated you will be displayed with the contents of the File Share you requested access to.