x
This website is using cookies. We use cookies to ensure that we give you the best experience on our website. More info. That's Fine
HPC:Factor Logo 
 

Installing Applications onto your Windows CE device when there is no automated installer

CESD|200053

Applies To

  • Windows CE 1.0, 1.01
  • Windows CE 2.0, SP1
  • Windows CE 2.11, 2.12, SP1
  • Windows CE 3.0
  • Windows CE .net 4.0, 4.1, 4.2
  • Windows CE 5.0

Overview

There are several ways that you can install applications onto your Windows CE based Handheld PC. This article covers the Flat File Upload method that you may find software presented in.

NB: This article is not applicable to Windows CE 1.0x

How-to Guide

There are three ways that a software developer my provide you with software for your Handheld PC. These are:

  1. CESD-S-0046 : Host Install
  2. CESD-S-0047 : Cabinet Install
  3. CESD-S-0048 : Flat File Upload

Each of the three types require a slightly different procedure to install the application. There are benefits for distributing software in the different types.

The method by which a particular piece of software is distributed by is weighed up by the application developer.

Flat File Upload - Installing Applications which have no Automated Installer

Distributing software using a flat file installation is uncommon. It is especially unusual with commercial software. Flat Files are usually provided for freeware and small stand-alone applications that you download from the Internet.

This method of installing software is the least user friendly and requires the end user to be confident in using the Windows CE Explorer on their Handheld PCs.
Software downloaded from the Internet which requires the user to manually upload the file are normally distributed in a compressed archive - such as a Zip or Tar file. Depending on your Operating System you may require a third party compression / decompression application such as WinZip or WinRAR.

Flat File Upload Zip File example

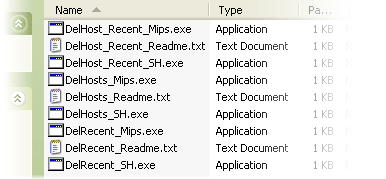
When you open the compressed file, or extract the files from the distribution file you will most likely see a number of similarly names files. Windows CE can run on a multitude of Processors. As a result developers must provide distributions of their applications targeted for each of the different processors that they wish to support.

Contents of a manual installation package

It can often be confusing as to which version of the .exe file you will need. You need to ensure that you use the correct file for your version of Windows CE and your CPU. The main CPU types that you may encounter are:

  • x86
  • SH3
  • SH4
  • MIPS
  • StrongARM
  • XScale

For a comprehensive list of Windows CE processors, as well as numeric CPU identification strings which can aid in the identification of the correct Windows CE cabinet installer please see CESDD0004.

If you are unsure which processor type your device uses you can ascertain which file you need to source by:

On your Handheld PC

  1. Click Start
  2. Select Settings
  3. Open the Control Panel
  4. Double Tap the System icon
  5. In the 'System' section of the General tab the make of your CPU will be listed next to 'Processor Type:'

Once you know which processor your Handheld PC contains. You must now upload the cabinet file to your device.

You must now upload the file(s) to your device.

Uploading the file(s)

There are a number of ways that you can upload the file(s) to your Handheld PC.

Upload using Microsoft ActiveSync:

  1. Connect your Handheld PC to your Host PC
  2. Open ActiveSync
  3. Wait for the synchronisation process to complete
  4. On the ActiveSync File menu click the Explore button
  5. Copy the file to the Handheld PC either by using the Drag and Drop process or Copy/Paste through the Windows Explorer file menu/right click
  6. The file will upload to the Handheld PC

Upload using a CF Card reader

  1. Remove the CF card from your Handheld PC
  2. Insert it into your CF card reader
  3. Open 'My Computer' on your PC
  4. Double Click the drive letter assigned to your CF card
  5. Copy the file to the drive either by using the Drag and Drop process or Copy/Paste through the Windows Explorer file menu/right click
  6. When it is safe, eject your CF card from the reader and return it to your H/PC
  7. You can now access the application file using the Windows CE Explorer's Storage Card shortcut

Other methods:

Other methods which may facilitate the delivery of an application file to your Windows CE device are:

  • E-Mail the file to your Handheld PC from the host PC
  • Place the file on a network share and access it over a LAN (See CESDC006)
  • Upload the file to a FTP account and download it using Pocket Internet Explorer or a FTP client on the H/PC
  • Download the applicable file from the Internet directly to your Handheld PC from its world Wide Web source (May require a third party Windows CE file decompression utility)
  • Beam the file to your Handheld PC from another Windows Mobile device, or from a PC/Mac using the IrOBEX/BTOBEX protocol
  • Use a terminal program to relay the file up to the Handheld PC from another computer system

Installing the file(s)

You can always run the application from where you uploaded it to. However HPC:Factor recommends that you store the application correctly on your Device.

If you wish to use a CF storage card to hold the program instead of using the Handheld PCs internal memory you can do so.
We recommend that you follow the Microsoft Program directory format and create a directory on the root of your CF card called 'Program Files'. Then install your applications into \storage card\program files\.

We also recommend that you try and install you applications organised by developer. For example if you are installing an application written by HPC:Factor install the application to:

\Storage Card\Program Files\HPC Factor\<application name>\
 
\Program Files\HPC Factor\<application name>\

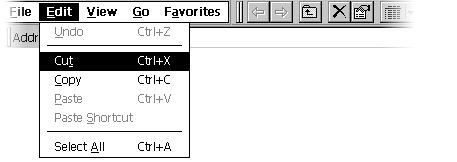
Create the directory structure on your Handheld PC by navigating to the Program Files directory and using the 'New Folder' option from the File menu in Windows CE Explorer.

Move the files you uploaded into the directory using the Cut and Paste commands from the edit menu

Windows CE Explorer Edit Menu

You have successfully installed the application file(s) to your device.

You may find that some applications contain sub directories or more than one files. The process for installing these files is identical to the process described above, however you must ensure that you maintain he directory structure.
You may also come across an application which requires you to install some or all of the program into a specific directory, such as \Windows. If the documentation tells you to copy some or all files into a specific directory then you should ensure that you correctly place the files.

Adding a shortcut in the Start Menu

Finally, you may wish to add an entry to the Windows CE Start Menu. To do this:

  1. Navigate to the location where you stored the main .exe file for the application you installed
  2. Highlight the file (Single Tap)
  3. From the Edit Menu choose Copy
  4. Navigate to \Windows\Programs. This is the file location for the Start Menu
  5. Create or navigate to a sub directory if you wish to file your application shortcut in a specific location
  6. From the Edit menu choose Paste Shortcut
  7. Highlight the application once again (Single Tap)
  8. Click the File menu
  9. Select Rename
  10. Now type a friendly name for the shortcut. You can safely remove the file extension.
  11. Press Enter when you have finished specifying a friendly name
  12. Your shortcut will now be visible on the Start Menu

Uninstalling

This method of distribution does not provide an uninstall routine. To remove the application and shortcuts you will have to manually remove the files and folders.
The Windows CE registry will also not be cleared of settings. You should not attempt to manually clear the registry unless you are proficient in doing so.