Synchronising a Handheld PC with Microsoft ActiveSync over a Local Area Network
CESD|200092Applies To
- Windows CE 2.0, SP1
- Handheld PC Professional, SP1
- Handheld PC 2000
- Windows CE 4.0, 4.1, 4.2 .net
Overview
This article explains how to synchronise over a network using Microsoft ActiveSync 3. HPC:Factor recommends that all users upgrade to ActiveSync 3.7.1 from older ActiveSync versions or from Windows CE Services.
Prerequisites
This guide assumes that a working network infrastructure is in place either within your organisation or home. This can either be a hard wired or wireless connection. All TCP/IP configuration must be complete before you can successfully synchronise via ActiveSync. For more information on setting up a Network see CESD-C-0004 - Networking 101 (Beginners Guide).
- A compatible Network Interface Card (NIC) is required.
- Corporate users will need their complete network configuration information from their administrator or access to a WINS addressing DHCP server.
- Microsoft ActiveSync Partnership. You cannot create a Partnership over the LAN or Sync via the LAN as Guest.
Windows CE 2.0
Users must install Service Pack 1 (SP1) and either the Networking Updates or the HPC:Factor Network Service Pack (NSP) before you can synchronise via a LAN.
Handheld PC Professional
It is recommended that Handheld PC 3.0 users install the H/PC Pro Service Pack 1 (SP1) before synchronising via a LAN.
Guide
Before you can synchronise via a Local Area Network you must have a clear path between ActiveSync on your host PC and ActiveSync your Handheld PC. If your Host PC is firewalled you should ensure that ActiveSync has been given authority to serve data to the LAN, as well as having added the Local Network to the trusted access Zone.
Enable Network Synchronisation in ActiveSync
ActiveSync allows users to control which connection methods are available. By default ActiveSync is configured to allow LAN connections. To enable / check these settings:
- Open ActiveSync by double clicking the Tray Icon
- Click File and select Connection Settings...
- Ensure that Allow network (Ethernet) and Remote Access Service (RAS) server connection with this desktop computer is selected

- Click OK to return to ActiveSync
Note that should the Status area not display Network is available as pictured, then the network on your computer has not been setup correctly and you will not be able to continue.
Configuring the Handheld PC to synchronise over the Network
The configuration steps needed to configure the Mobile Device will depend on the Network infrastructure available to you.
Windows Server Corporate Network Users:
If you are based on a Corporate Network running Microsoft Server solutions, with WINS servers available then your Handheld PC may be automatically configured at this stage. For automatic configuration to be available to corporate users without any manual configuration steps WINS settings must be made available from the DHCP server. If you are unsure whether WINS is being served via DHCP consult with your network Administrator.
If DHCP does not provide your device with WINS server addressing, or DHCP is not available on your network then you should insert the WINS and DNS server addresses into the Network configuration area in Control Panel.
All other users:
In order to work reliably, Windows CE required a WINS server. If one is unavailable then you will have to specify the configuration of your network manually.
- On your Host PC click Start and then Run
- In the Address box type:
cmd (Windows NT4, 2000, XP, 2003)
command (Windows 95, 98, 98SE, Millennium)
- Click OK
- In the Windows Command Console (DOS Window) that opens type:
ipconfig /all
- Press enter
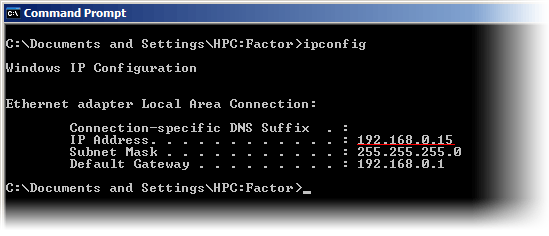
- The basic TCP/IP configuration will be displayed as follows. Note the value for IP Address

- On the Handheld PC tap Start, Settings and open Control Panel
- Double tap the Network icon to launch the Network Configuration Applet
- select the Network Adapter that you use and tap properties
- Open the advanced TCP/IP addressing properties area
- In the entry for Primary WINS Server type the IP address you noted down in step 6
- OK back to the Control Panel
- Soft reset your Handheld PC
To Initiate the Synchronisation
- Tap Start, Programs, Communications, ActiveSync
- From the Connect using drop box choose Network Connection
- Select the computer to synchronise with from the Connect To list
- Tap Connect...
- ActiveSync should now initiate a connection via the LAN


