Guide to configuring the Nokia D211 for use with GPRSCESD|200177Applies To
OverviewThis article discusses the steps involved in configuring the Nokia D211 mobile connection card to connect to a GPRS service provider. How-to GuideBefore proceeding, please be sure that your device meets the minimum system requirements, and that your cellular service provider has enabled your Subscriber Information Module (SIM) for GPRS data transfer and that the D211 is present in the device, and has been powered. Drivers for the Nokia D211 can be found in the Hardware Compatibility List if required. Easy Connection FeatureBefore proceeding to attempt to manually configure the D211 to connect to your cellular provider's data service. You should use the easy connection facility of the driver software, which will attempt to automatically configure the Access Point Name (APN) of your connection.
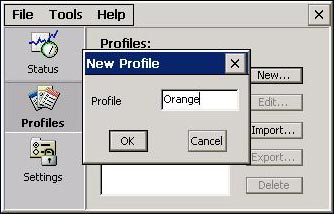
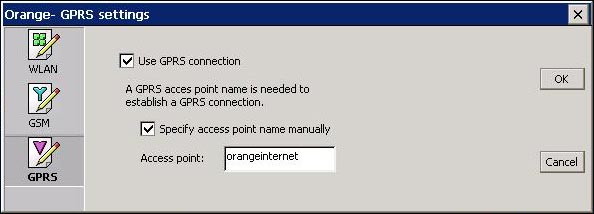
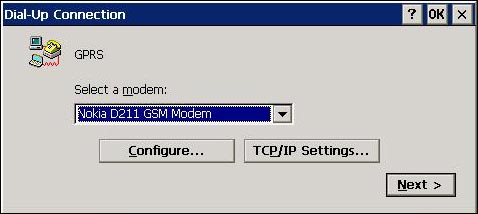
Manual APN SpecificationIn order to manually configure the Access Point Name (APN) used by your service provider you will require the GPRS configuration information applicable to your service provider and account. This information can usually be obtained in your welcome pack or from the support department of your cellular service provider.
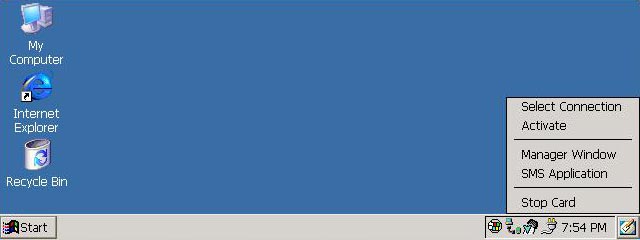
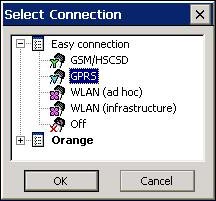
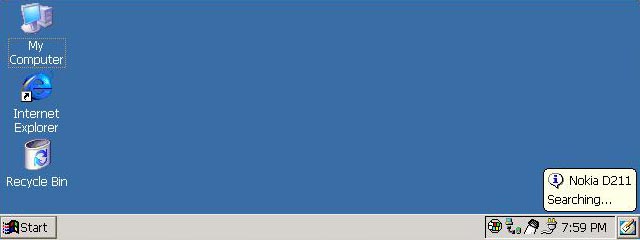
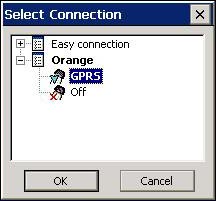
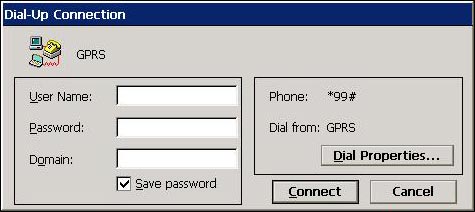
In some circumstances it may be necessary for you to specify access credentials such as a username and password. Instructions on associating access credentials with the connection can be found below. Activating a ConnectionAt this point you should close all active D211 configuration windows and return to the desktop. Tap the D211 tray icon and choose the Select Connection option. You will be presented with the list of available profiles. Tap the newly configured profile name and then the GPRS option e.g. Orange, GPRS. A notification balloon will appear by the system tray stating Searching If the balloon message changes to read Ready To Activate GPRS the APN connection has succeeded To initialise the connection tap the tray icon once again and select Activate If the balloon popup changes to read GPRS Active then your GPRS connection is enabled and your Handheld PC will have Internet connectivity. At this point you will be subject to full data service GPRS tariff charges for any data you transmit or receive across the connection. If the balloon popup changes to read GPRS Deactivated you should check your settings, specifically whether you are required to specify a username and password and whether you have sufficient credit on your SIM to access GPRS. Extra SettingsThese settings may not be required by all users. Unless you are experiencing problems, it is recommended that you ignore the information outlined below.
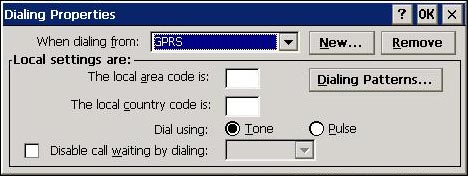
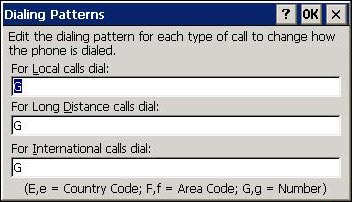
Dial Strings, baud rates and IP configuration
Specifying a Username and Password
You should now be able to connect to the Internet using the Nokia D211 and your Handheld PC. AcknowledgementsWith thanks to chazco for working with us on this article Tags | D211 GPRS HPC2000 Nokia Windows CE 3.0
|