Creating a Transparent Desktop Wallpaper for your H/PC
CESD|200041Applies To
- Windows CE for Handheld PC 2.0 and above
Overview
Windows CE gives you the ability to create a limited formatted image that will give the effect of having transparent parts. This type of image will allow you to create a image for your HPC, such as a corporate logo. That will remain tidy on the desktop even if the user changes the interface colour scheme of their HPC.
How-to Guide
When is Black not black?
When its on Windows CE.
If you like to change the UI colour scheme of your Handheld PC, notably the desktop colour, you will know that if you have a wallpaper displayed, changing the desktop colour will make the desktop overall look untidy. There is an answer. Although be it limited in its functionality for graphics designers. It can allow for a wide level of corporate branding while preserving tidiness.
Take the following image.
| Original (Special Format) |
Original (Standard Format) |
 |
 |
When displayed in its original formatting on the Handheld PC the black background is automatically removed, replacing it with the background colour of the device. As you can see below. The Specially formatted image no longer has a black background. However the standard image type shows none of the same attributes.
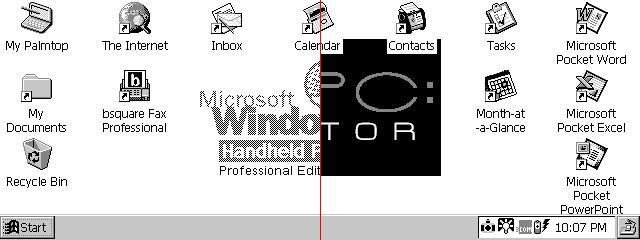
This is the same image, as the first one, but displayed on Windows CE. As you can see. Black is anything but black.
The reason why this works is down to the special formatting of the bitmap image. Windows CE devices have full support for the bitmap format, including its CE specific .2bp format. However there are several versions of the BitMap format, each allowing for a differing number of colours to be mapped. The amount of colours that can be mapped in any single image file is represented by your image editor as X bits.
Generally, a full colour, photo bitmap is a 24bit image file. 24bit image files are very large, as a results compressed formats such as JPEG were created.
Windows CE, when presented with a BitMap file will generally just display it as is. However, if presented with a 1bit BitMap image file, the background is filtered out when it is displayed.
Image formatting follows the following rules:
| 32bit |
= |
16,777,216 + 256 Alpha |
| 24bit |
= |
16,777,216 |
| 16bit |
= |
65,536 Colours |
| 8bit |
= |
256 Colours |
| 6bit |
= |
64 Colours |
| 4bit |
= |
16 Colours |
| 2bit |
= |
4 Colours |
| 1bit |
= |
2 Colours |
NB: A 1bit BitMap is a true BitMap. The use of 'BitMap' to describe any other format file is technically in correct, however has become the norm to describe the file type.
Unfortunately the use of a 1bit BitMap file does have some drawbacks as well as advantages.
1 bit files are incredibly small, the smallest an uncompressed BitMap can be. This makes them ideal for use on Windows CE devices, especially older devices which have limited storage space as well as limited processor power to draw the desktop to the screen.
In a 1-bit BitMap file however, the information used within the image can only have two possible results, either On or Off. As a result of this limitation the pixels that make up the image can only be either Black or White. There are some tricks that you can use to give the illusion of a larger palette, discussed in the how-to. 1bit BitMap files do not allow for palette modification to change the two colours as Indexed BitMaps do. This means that your image is restricted to being fairly basic.
This process has been written for Adobe Photoshop on the PC. It will be similar for Photoshop on the Mac. Other image editors will have similar functionality, however HPC:Factor has chosen only to cover Adobe Photoshop.
| |
1. |
|
Create a new image at the required dimensions, or import the image you wish to convert to 1bit.
|
|
 |
2. |
|
As 1bit files are monochrome (Black & White Palette) many image are not suited to be converted to this format. You can implement some optical tricks which give the sense of a wider range of shades.
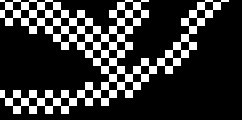
In this image the shade of the main graphic appear to be grey. This is created using an optical illusion that tricks the human eye. If you look at the image close up you will see that it really consists of alternating pixels of black and white. This process is called Dithering
|
| |
|
| |
3. |
 |
Photoshop can automate the process of dithering. It would be very difficult to manually create the effect of more shades in your image. In order to output a reasonable 1bit image, the original graphic must not be complex.
Dithering comes into its own when converting an image, however you should remember that before you choose to use the dithering options on your graphic. The black pixels will be replaced with the colour of the HPC desktop background.
|
| |
|
| |
4. |
|
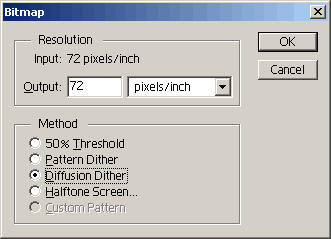 If you wish to use diffusion on an new or existing image: If you wish to use diffusion on an new or existing image:
- Create / Open your graphic file
- Select 'Image' > 'Mode' > 'Grayscale'
- If prompted to flatten your image, choose 'Flatten'
- Select 'Image' > 'Mode' > 'Bitmap'
- Choose one of:
Pattern Dither (Creates a pattern giving the shade effect)
Diffusion Dither (Alternates pixels and intensity to give shade)
Halftone Screen (Allows for specifying the shape of the shade texture)
- Select OK to apply the dither & convert the image
|
| |
|
| |
5. |
|
If you wish to create a new or convert an existing image strictly:
If creating a new file:
- Choose the File menu and select New
- Setup your desired image dimensions and file name
- In the mode box choose Bitmap
If converting:
- Open your graphic file
- Select 'Image' > 'Mode' > 'Grayscale'
- If prompted to flatten your image, choose 'Flatten'
- Select 'Image' > 'Mode' > 'Bitmap'
- Choose 50% Threshold
- Select OK to apply Bitmap conversion
|
| |
|
| |
6. |
|
You graphic will now be converted to a 1bit BitMap file. The quality of it will be greatly reduced. You may need to experiment with the best conversion configuration for you image, as well as checking it on your device.
In the following example the HPC:Factor logo was converted using Halftone (Square)

|
| |
|
See Also
Adobe Systems: http://www.adobe.com/


 If you wish to use diffusion on an new or existing image: