Creating Optimised Handheld PC Wallpapers in Adobe Photoshop
CESD|200039Applies To
- Windows CE for Handheld PC
Overview
Following on from our last Wallpapers How-to (CESD-S-0013), which covered how to create 2BP files for your Windows CE device. This article covers how to create Wallpapers for a Handheld PC device in Adobe Photoshop, as BitMap files, rendered specifically for the display colour / shade depth that you are using.
This article is intended for creating .bmp files for use on the Handheld PC. Allowing for more customisation than that provided by the 2BP engine of Tascal Soft's bmp2bp. This article does not allow for the saving of files with the .2bp compression suffix - Please see CESD-S-0013 if you wish to render .2bp files
This article makes provisions for 4 & 16 Shade Grey Scale devices, as well as 16 and 256 colour devices. High Colour devices do not benefit visually from rendering the image to a smaller colour palette.
This article is primarily based around the CESD-S-0022 File Colour Tables file download.
Downloads
How-to Guide
The following how-to steps describe how to render an image using a smaller Colour Palette in order to reduce the file size of a BitMap graphic and customise its rendered appearance on your device. It assumes that the user is familiar with Adobe Photoshop.
NB: For the benefit of non Photoshop users. Windows Colour Palette files (.pal) are provided in the download as well as Adobe Colour Table (.act) files. Other imaging applications may be able to modify their output using either file.
This process has been written for Adobe Photoshop on the PC. It will be similar for Photoshop on the Mac when importing the Act palettes.
| |
1. |
|
Extract the ACT files from the hpcf-hpc-col-tables.zip to your hard drive and Launch Adobe Photoshop.
|
|
 |
2. |
|
Import the image you wish to convert:
If the Image is to become a desktop wallpaper ensure that the images maximum size meets the screen size of your device. The diagram below shows the necessary image specification.
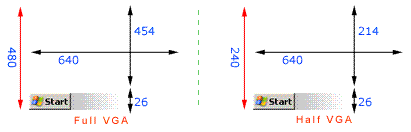
Full VGA:
640 x 454 + 26
Half VGA (Clam Shell):
640 x 214 + 26
|
| |
|
| |
3. |
|
In order to manipulate the image into the desired depth of colour you must change the Image Mode from a True Colour image (usually RGB). To a image which uses a mapped colour palette or Indexed Colour.
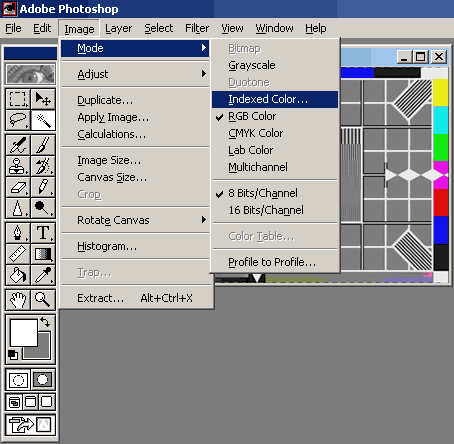
To begin the process of converting the image to Index Colour:
- Open the 'Image' menu
- Expand the 'Mode' option and Select 'Indexed Color...
|
| |
|
| |
4. |
|
The Indexed Color configuration Window:
Indexed Colour allows you to specify up to 256 unique colours for an image to be displayed in. One of which can be a transparency. The reason for having indexed colour graphics is to reduce the file size of a graphic, while retaining the overall image quality for viewing on a low colour depth display.
Early PC's often up until 1995 and Handheld PC's up until Handheld PC Professional was released. Did not have the ability to display High Colour graphics, so using High or True Colour (16, 24 and 32 bit) graphics on these devices is a waste of storage space.
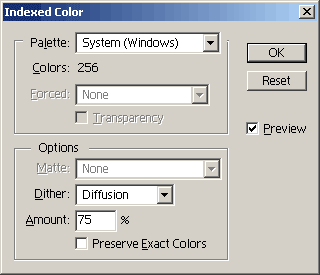
Firstly you need to select the Colour Palette that you wish to convert the image into.
From the 'Palette' drop box choose 'Custom...' to open the Colour Table window.
|
| |
|
| |
5. |
|
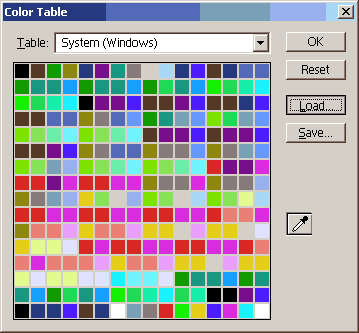
In the Colour Table window choose the 'Load...' button.
|
| |
|
| |
6. |
|
Navigate to the location where you extracted the CESD-S-0022 Adobe Colour Tables.
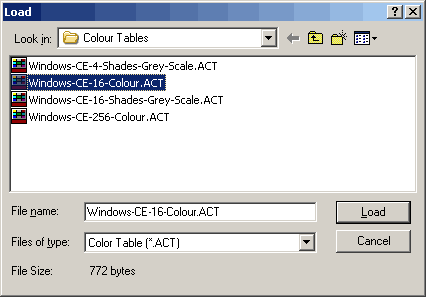
Select the appropriate Colour Table for your device. For example the HP 320lx has a 4 Shades Grey Scale display, so select the appropriate profile for your target screen.
|
| |
|
| |
7. |
|
Photoshop will load the profile, in the example the 16 Colour profile has been loaded.
Index Colour profiles allow for a maximum of 256 colours, which will be displayed in the 16 x 16 grid displayed below.
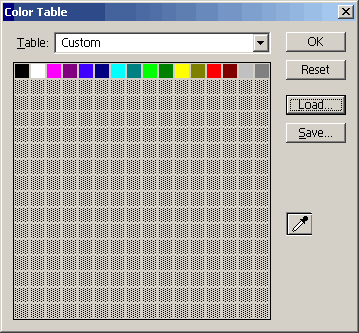
Click the 'OK' button to apply the profile to the image
|
| |
|
| |
|
|
As you can see, the example image has changed considerably.

Photoshop returns you to the Indexed Colour screen to allow you to further configure the display options of your image.
|
| |
|
| |
|
|
The main configurable option here is the 'Dither' drop box
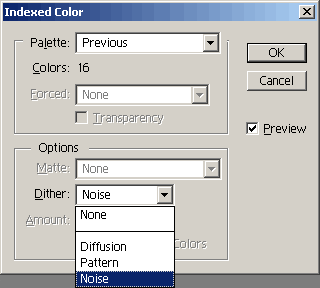
Cycle between the 4 Dither options in the list. None, Diffusion, Pattern and Noise. Each one produces a different variant of your image. Depending on the complexity of the original image, different dither modes will produce a different result.
The Diffusion option also allows further customisation by selecting how heavy, as a percentage the dither is.
As a general rule, for photographic images, the diffusion option produces the best results.
|
| |
|
| |
|
|
Displayed below are renders of our example image in each of the different dither formats.
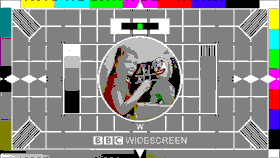 |
| Dither: None |
|
 |
| Dither: Diffusion |
|
 |
| Dither: Pattern |
|
 |
| Dither: Noise |
|
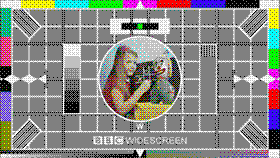
Demonstration Image © BBC, Snell & Wilcox
|
| |
|
See Also
Adobe Systems: http://www.adobe.com/
Snell & Wilcox Home Page: http://www.snellwilcox.com/internet/
BBC Home Page: http://www.bbc.co.uk/